Friday, May 19, 2017

THE THUMB & MORE (Part 3 of 3 - The Afterthought Thumb)

This is Part 3 (of 3) of my mini-tutorial on the afterthought thumb used in making my Multi-Pane Mittens. Part 1 was THE FORETHOUGHT. Part 2 was THE PICK-UP.
 
THE THUMB & MORE.

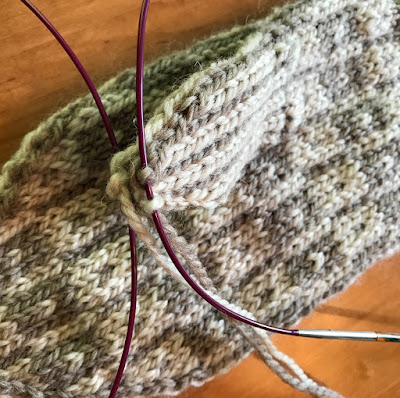
We ended Part 2 with a slightly scary looking thumb hole. Please do not be afraid of the floats!

 
IF YOU ARE USING DOUBLE-POINTED NEEDLES... You will need to introduce another needle before you can knit in the round. I suggest that you place the first 5 sts from the lower needle on a third dpn.

IF YOU ARE USING TWO CIRCULAR NEEDLES YOU ARE READY TO GO. All photos will show the use of two circular needles, my own preferred needle type.

The first row of the thumb will be knit in color A. I suggest that you leave an 8-10" tail when you join A at the right side of the bottom stitches. (The reason for this will follow near the end of this post.)

THUMB
Rnd 2: With A, k9... these will be straightforward,


pick up 1 st between bottom and top of thumb... make sure that you create the new stitch by going below at least two strands of yarn,


knit 9 sts for the top of thumb... ignore the floats attached to two of these... let them "float" behind your work,


pick up 1 st between top and bottom of thumb... once again, make sure that you create the new stitch by going below at least two strands of yarn,


– 20 thumb sts... Not so bad. Right?


Rnd 1: (Join B.) *With A, k1, with B, k1; rep from * to end...

Continue to follow pattern to finish knitting of thumb.


There is one more step to the afterthought thumb. More often than not you will have a hole on one or both sides of the thumb. If your holes are as noticeable as the one shown below, they will require a stitch or two to sew closed.


Usually you can use the tail that was created when you joined your yarn to begin knitting the thumb. (If not use a new piece of yarn and weave its end in to start.)

Turn the mitten inside out, and take little stitches catching just one yarn at a time.


Check the outside of the mitten before weaving in ends.


No more holes.


All that my mitten needs now is a nice bath. Stranded colorwork evens itself out beautifully after a gentle hand-washing.  Use lukewarm water and mild soap, rinse, blot out excess moisture and lay flat to air dry.


Thursday, May 18, 2017

THE PICK-UP (Part 2 of 3 - The Afterthought Thumb)

This is Part 2 (of 3) of my mini-tutorial on the afterthought thumb used in making my Multi-Pane Mittens. Part 1 was THE FORETHOUGHT.

THE PICK UP.


Before you can knit the thumb of your mitten, you will have to place the thumb stitches on needles, and remove the waste yarn. The Multi-Pane Mitten pattern has step by step instructions with photos. This tutorial will show the process in greater detail. 

Using two (double pointed or circular) needles, with first needle, from right to left, pick up 9 sts below waste yarn. (If you think of each knit stitch as a ‘V’ with a right and a left leg, you will be picking up the right leg of each ‘V’ below the 9 ‘V’s of your waste yarn. This part is rather straightforward.


 Your picked up sts should begin and end with A.)


Rotate the mitten 180 degrees.


With second needle, in a similar way, pick up 9 sts below waste yarn. In this position, the stitches you pick up will appear to be a half stitch to the left, and some of the 'V's will be have two different colored legs -- but once again, pick up the right side of each ‘V’ below the ‘V’s of your waste yarn.


Hint: Your 9 picked up sts should begin and end with B.


Carefully remove the waste yarn. I like to use a spare knitting needle to lift the waste yarn stitches, half-a-stitch at a time. (Remaining photos are with mitten cuff down.)


Now your mitten has a thumb hole. Some of the upper 9 stitches will have floats attached. Don't let them scare you. Tuck them into the mitten, and try to ignore them. They really will not be a problem and will stay behind the work after the first round of the thumb is knit.


What a lovely thumb hole!

My next post is on knitting and finishing the thumb. 

Part 3 of the The Afterthought Thumb: THE THUMB & MORE


Monday, May 15, 2017

THE FORETHOUGHT (Part 1 of 3 - The Afterthought Thumb)

This is Part 1 (of 3) of my mini-tutorial on the afterthought thumb used in making my Multi-Pane Mittens.

THE FORETHOUGHT.

When you reach round 16 of the mitten chart you will cement in place the location of the thumb... A major event in making your mitten... and yet, so easily done.

For the same reasons that your right and left mitten will mirror each other, the thumbs will be placed in opposing positions on round 16 for each mitten. In this post I will show photos for the first (the right) mitten in the pattern.


For round 16 of the right mitten, you knit one stitch in color A and then knit 9 stitches with your waste yarn.

[For the left mitten, you work round 16 as all previous rounds until 11 stitches remain. At that point, you knit 9 stitches with your waste yarn.]

In either case, for each mitten, the thumb location has now been established. For each mitten the next instruction is, "slip these 9 sts from right needle back to left needle." I recommend that you slip them one at a time, which looks something like this.


And results in this.


At this point you go back to following the chart. For the right mitten shown here you begin with the second stitch of of Row 16. For the left mitten you begin with the fourteenth stitch.


You will be knitting into the 9 stitches made of waste yarn.


With all necessary forethought for your afterthought thumb accomplished, you can happily knit on to the tip of your mitten. My next post is on picking up the stitches to knit the afterthought thumb.

Part 2 of The Afterthought Thumb: THE PICK UP